
My niece’s first year wedding anniversary was last week. I tried something different with a few of their wedding pictures to remind all of us of the great celebration we enjoyed a year ago. I gave new life to some very common photos of their wedding by experimenting with the duotone options inside Photoshop.
Usually we think of a duotone image as using black with one other color. You can easily do that inside Photoshop, but you can also just as easily use any two colors for your duotone. Let’s look at how to change your images into a duotone image using Photoshop.
Take Your Color Image to Black and White
We need to get to a black and white image before we can convert the image to a duotone image. I recommend using the Black and White adjustment layer to take your image to black and white. This method gives you the most control in setting black and white values for the various colors.

Click on the Black and White Adjustment layer option from the Adjustments panel. The sliders available within the properties of the black and white adjustment layer gives you control how the various colors are converted to black and white. Experiment with these sliders to give you the contrast or feel that you want for your black and white image.

After applying the Black and White Adjustment layer, you’ll notice the additional layer in the layers panel. The beauty of adjustment layers is the option to go back and change the layer’s settings. If you want to change the settings, double-click on the layer’s icon.
Once you have it converted to black and white, you’ll need to flatten the image before changing the color mode to duotone. Before we explain that process, you need to be aware that you can also change this image into a duotone by using the Black and White Adjustment Layer.
Using the Tint Option to go to Duotone

Edit the settings for the black and white adjustment layer and you’ll notice a Tint option at the top of the properties panel. Turn this option on and you can select the tint you want to apply to your black and white image. Be aware that this method doesn’t take the image to the duotone image mode, but it does give you the same affect.
Converting to a Duotone Image
If you want to make a ‘true’ duotone image, follow these steps.

Flatten the image. Flatten the image image from Layer panel menu versus using the default flatten option that comes with Image/Mode/Duotone. Using the layer panel menu will preserve your black and white adjustment layer settings.
Now we are ready to set this to the duotone image mode. We first need to set it to grayscale. Be sure to follow the steps below, so you retain the black and white settings you have already applied.

Select Grayscale under the Image / Mode submenu.

Then go back to the same menu option and select the Duotone image mode.
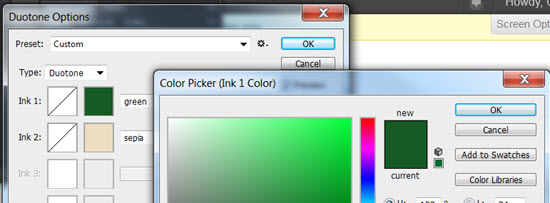
Select the Duotone option from the drop down options for the Type field.

Now you’ll have the option to add your second color. The first color will default to black.


The beauty of using this method is the ability to go back and change the colors you are using. Be returning to the Duotone option under Image / Mode, you can change the ink colors for the duotone.

You can change one or both ink colors. Note: If you want to get even more creative, change the type to a Tritone or Quadtone and add even more inks.

Since green was one of the color’s of my niece’s wedding, I experimented with using a green color in the duotone. I ended up liking the black / sepia combination the best as shown at the top of this post, but it was fun to try using different colors.
What has been your experience with using the duotone option in Photoshop?