

Last week we covered how to bring a website menu designed in Photoshop to WordPress. In that discussion we looked at a few of the steps on how to set up Photoshop text in WordPress. Let’s go deeper into the various settings and CSS properties that can be set to duplicate your Photoshop Text in WordPress.
Let’s start with the most common CSS settings for formatting text for a WordPress website: the font, font size and font color. Be aware that always first check the Theme Options and/or the Customize option under Appearance of the Dashboard before changing any CSS code. If you can make the update under Appearance, make the change there. If not, then the CSS code will need to be updated. This post focuses on updating CSS code. If you need help in determining where to update your CSS within your WordPress theme or to find the CSS code that needs updating, refer to the the post, How to Get the Colors I Use in Photoshop to WordPress.
Set Font for WordPress Website
The font is set in CSS via the font-family property. Often, the default font for the entire site is set with the CSS code for the body tag.

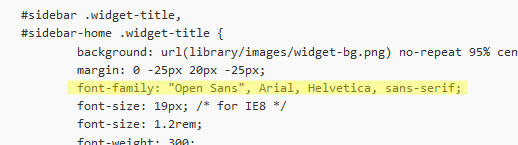
This sets the default font for the website to Verdana. If the website visitor doesn’t have the Verdana font on their computer, it’ll use Geneva. If Geneva isn’t installed, it’ll use a sans-serif font. If you don’t want to use the default font within a section of your site, you can change the font by using the font-family property within the appropriate section of the site. For example, in the following CSS code, the font is changed for any sidebars.
In Photoshop CC (and CS6), there is an option from within Photoshop to convert a text layer to CSS. After selecting the text layer in the layers panel, choose Copy CSS from the Layer option of the main menu. This places the CSS code to the clipboard. Paste this into Notepad or other text editing program.

The first three properties are the CSS properties to focus on and to bring over to WordPress. You can get the CSS code this way. Or, you can observe the text settings within Photoshop and add the necessary CSS properties within WordPress. Be aware that the CSS code provided by Photoshop is not complete. It is a good start, but for example, you’ll want to include a list of fonts for the font-family property.
To determine what to set the font-family to from inside Photoshop, select the text in Photoshop, select the Text Tool and click inside the text area. Observe the settings for the text at the top of the Photoshop window in the Control Panel.

Since this is the text for the main content area, we’ll use these settings for the font-family property. It’s best to create a list of fonts (although Arial is a very common font) when setting the values for font-family. A common font list for Arial is:
body {
     font-family: Arial, Helvetica, sans-serif;
}
If the name of your font is two words or more, be sure to list the font name inside single quotes. The setting above sets the default font for the website to Arial. If you want to use a different font in a particular section (heading, sidebar, etc.) add the font-family property within the appropriate CSS class or id.
Set Font Size for WordPress Site

Font-size is the property to set the size of the font – whether it’s for the entire site or a heading or a section of the site. Notice above that we set font-size twice. The first occurrence sets font size for older browsers. The second occurrence is .9 of the font size of the root element (html tag). It’s recommend to use the rems unit of measure as it avoids the other issues associated with px, %, or em. However, use it in combination of the pixel size to accommodate for older browsers.
Set Font Color in WordPress
To set the color of font, we simply use the color property in CSS. Again, be sure to check Theme Options or Customize under Appearance before updating any CSS. If you can update the color of the font under Appearance, do it there versus inside CSS.
If the option to set the font color is not available under the Customize option or Theme Options, you’ll need to use CSS. Simply, update the color property for the appropriate tag, class or id. If you want to set it for the entire website, it’s common to set color in the body tag.
body {
   color: #fff;
}
If you need to change the text color for a sidebar, set the Color property within the appropriate class. For example,
#sidebar-widget {
    color: #d70344;
}
will set the font color for the sidebar-widget section.
Set Font Color for Hyperlinks/Mouseover
If you want to do a different color for links, set the color for the ‘a’ tag.
a:link {
   color: #ff0000;
}
You might also want to set the color of the ‘a’ tag within a specific id or class.
.widget a:link {
   color: #00f;
}
If you want to change the color of text upon a mouseover, add the :hover state to the appropriate class or id.
.main-content a:hover {
    color: #f00;
}
Setting the Line Height
The CSS property for setting the space between lines of text is line-height. The line-height can be set for the entire site within the CSS for the body tag. To find the line height used in Photoshop, place the cursor within the text area and check the paragraph panel.

The line height can be ‘reset’ for any id or class of the site.
body {
    line-height: 1.4;
}
The line-height is sent to 1.4 times the size of the font in the code above. Line-height can be expressed as a number or a percentage, or as a fixed size (px, pt, etc.)
Space Between Paragraphs
You can also set the space between paragraphs. This is a common practice to add white space amongst long formats of text. In the CSS world, this is done by formatting the paragraph tag. Instead of line-height, we’ll use the margin property.
p {
  margin: 6px, 0px;
}
This sets a 6px margin above and below paragraphs of text.
Margins Around Text
You can also add white space on the left and right side of text. You may want to do this with sidebar content, or even within your main content to add white space. Do this by either adding a class with the desired right and left margins, or by setting the section (id) with the appropriate left and right margins.
.indent-text {
    margin: 0px 2em;
}
The margin can be any of the standard units of measure (px, pt, em, %, etc)
These are some of the most common CSS properties used to style WordPress text to match what is used in Photoshop when designing a website or a section of a site. What settings or other properties have you used when styling your text in WordPress?