

This post is part of the Photoshop to WordPress series. In this post, we are going to look at how we get the same colors we use in Photoshop to our WordPress website. This may include the background color for the entire website, or the background color of a sidebar widget. It may be the color of a heading, or the color of text.
When I first began using WordPress, I knew Photoshop better than WordPress. I was used to doing a mockup of a website inside Photoshop, then converting it to HTML/CSS. As a beginner in WordPress, I wasn’t comfortable creating an entire theme from scratch. I could usually find a theme that worked for me, but often wanted to customize the colors. This post shows you how to get your colors from Photoshop to WordPress.
CSS Properties for Setting Color in WordPress
Before we get into the details, you must be familiar with CSS, at least enough to be able to look at CSS code and determine what is being styled and how it is being styled. With that being said, the specific CSS properties we’ll be looking at are background-color and color. Your theme is already setting these colors – whether it’s setting the color for the specific element or defaulting to the theme colors. Either way, you’ll be able to go into the CSS and either change the color if it’s already being set for that specific element, or add the necessary CSS if it’s not already being set for that specific element.
How to Update CSS in WordPress
The steps to update CSS will vary depending on the theme of your WordPress website. Follow these guidelines when it comes to updating CSS for your WordPress website.
- Check under Theme Options for a CSS option. If there is one, update your CSS code there. This will ensure your customized CSS will carry over for any future theme updates.
- If you have a plugin that handles/edits CSS code, use the plugin option to update CSS.
- If you don’t have wither option above (there is not a CSS option under Theme Options and you are not using a plugin to update CSS), and if you are using a Child theme, update your CSS code under the Editor option under Appearance (from the main Dashboard Menu). By default, the CSS will come up when selecting Editor. If it doesn’t come up, select the CSS file for your child theme from the list of files on the right side.
- If neither of these options are available or you are not using a child theme, create a child theme, importing the CSS from your theme and update the CSS within your just-created child theme (as mentioned in Step 2). Creating a child theme ensures that when your theme is updated, your customized CSS code will stay intact. ManageWP has a great tutorial on how to create a child theme. WPtuts+, part of the Tuts+ Network, also has a great tutorial on Child Theme Basis and Creating Child Themes in WordPress.
At this point, we assume you have found where you need to update the CSS for your theme.
How To Find the CSS Code to Update in WordPress
Now that we know how to update CSS for our theme, let’s learn how we determine what needs to be updated in CSS. First, bring up your site in a web browser. We’re going to look at your site from a browser window to determine what needs to change in CSS! Most browsers have an ‘Inspect Element’ option available. This option lets you view the HTML and CSS for any element on your website. Simply right click the element on your web page and select Inspect Element. (If this option is not available, you may need a plugin for your browser. Do a Google search for ‘How to use inspect element in browser name‘.)
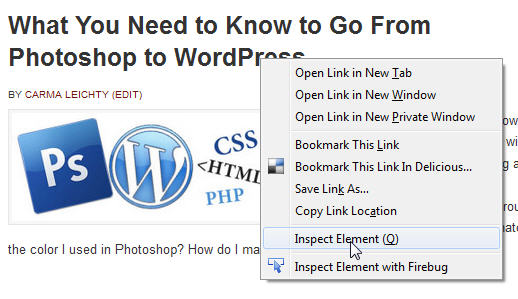
In this example, we want to change the color of the heading of the blog post. I right clicked on the heading, and selected Inspect Element. (The right click works for Firefox and Chrome. It may be a different keyboard shortcut for other browsers.)
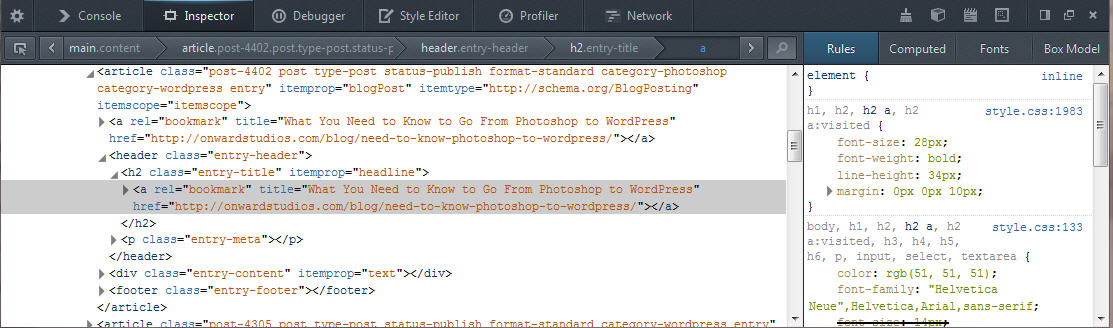
Inspect Element will open a window at the bottom of the browser window. On the left is the html code, with the selected element highlighted. On the right, is the CSS code that affects only the selected element (not the entire CSS file, which is incredibly helpful!). We will review the CSS code to find what we need to update inside CSS.
How to Find the CSS Code to Update
Review the CSS code on the right side of the Inspect Element window. We already know if we want to set either the background color or the color of text, we are looking for these two properties, respectively: background-color or color. In this example, we are changing the color of a heading, so we will look for the color attribute associated with a heading tag.
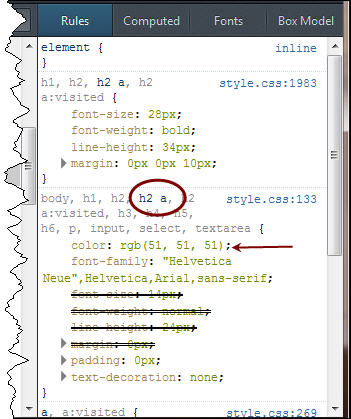
Remember, the CSS shown on the right side is only the CSS that affects the select element, not the entire CSS. It lists the CSS entries from top to bottom in order of specifity. I want to find the top-most color property that isn’t crossed out. If the property is crossed out, that means there is another entry that takes precedence. The red arrow in the image above indicates the color property that needs to be updated to change the color of the heading. Inspect Element shows the color as an rgb value.
Notice also in the entry above that the ‘h2 a’ tag is not grayed out, indicating that is the selected element.
If I want to test this before I update CSS back inside my WordPress Dashboard, I can enter the new color within this window and it will immediately show me the end result. Be aware that any changes in this window are only temporary. Even though the changes will seemingly update the website, it is not affecting the ‘live’ site. No permanent changes can be done within this window.
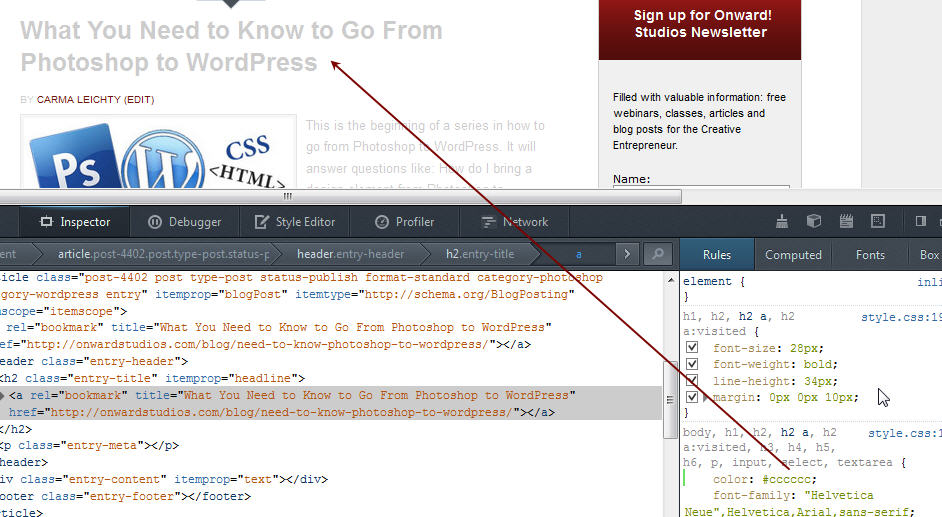
To change the color, simply click on the rgb values for the color, and enter the color you want to use. As you can see above, I entered the hex value #cccccc. (We will discuss how to find the hex value inside Photoshop below.) This feature of testing your changes via Inspect Element is incredibly helpful in determining not only what needs to change inside CSS, but to see the end results before updating CSS inside your WordPress website.
Finding the hex value of color in Photoshop
I often use Photoshop to come up with a mock version of an entire website or part of a website. I want to take the colors I’ve used in Photoshop and use them inside WordPress. To do this, I need to get the hex value of the color from Photoshop. (I use the hex value. You can use the rgb values, if you prefer.)
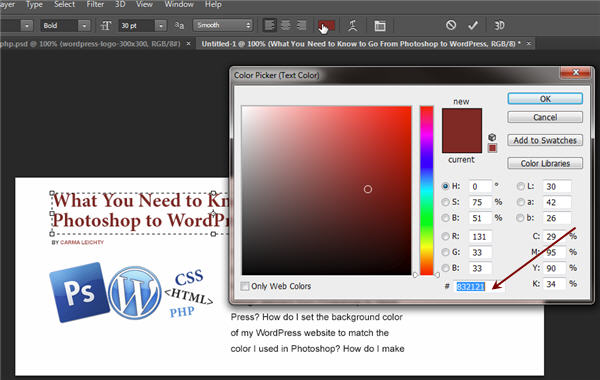
Inside Photoshop, since we’re working with a heading, I’ll grab the text tool. I’ll click on the heading layer and place the text tool inside the heading so I can get the color. (Depending on the element you are working with, you may use a different tool. For example, if you’re wanting a color of a background you may select the shape tool.) Get the color of that element via the color picker window. In this example, we notice the color is #832121. This is the color value we will use in CSS.
Updating CSS in WordPress
Now that we have the value of the color, let’s update CSS inside WordPress. If you want to test this before we update the actual CSS, use the Inspect Element feature as described above.
One thing to be aware of is that a change in CSS may affect more than what we want. In this example, we know specifically that we want the h2 tag to take on a certain color—so we will be specific to the h2 tag. We also need to be aware of the ‘container’ of the h2 tag. If you know CSS, you are aware that you can have an h2 tag for the main content area and another h2 tag with different styling for the sidebar area. We will take this into account when we update CSS inside WordPress.
Limiting CSS Update to A Specific Content Area
To limit this CSS update to only the h2 tag within the main content area, I am going to return to the Inspect Element feature. This time I am going to pay attention to the gray bar above the html code.
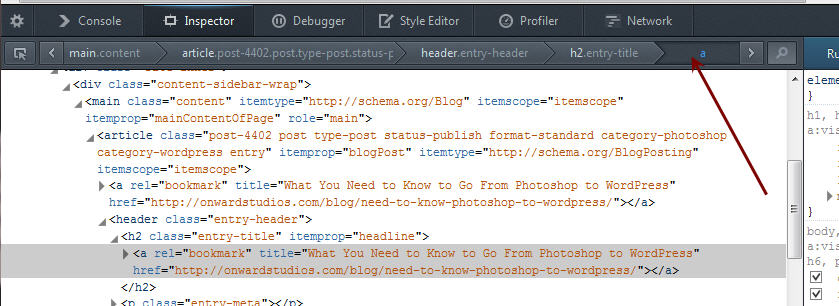
The bottom or lighter gray bar at the top of the Inspect Element window indicates the ‘container’ of this h2 tag. The ‘a’ says it’s a link. As we read this bar to the left from the ‘a’ (red arrow), we notice it is within the main content area. If you are familiar with CSS, we can tell that content is a class. If we want to limit this color update to only h2 tags within the main content area, the CSS would be:
.content h2, .content h2 a {
        color: #832121;
 }
Note: Updating the CSS just for the h2 tag (without .content) would probably work in this case. However, it’s best to always be as specific as possible within CSS to avoid any unwanted surprises. I also added the style to the anchor tag so all h2 headings will take on this color—whether or not they are a link.
If we wanted to update a background color (ie, color behind a sidebar widget or behind a heading or for the entire website), we would follow the same steps above. The only difference would be is that we’d update or add the CSS code for background-color (instead of color) for a container versus an h2 tag.
If you want to see all posts in this series, start with What You Need to Know to Go From Photoshop to WordPress.
What’s been your experience in bringing over colors from Photoshop to WordPress? What works best for you? Or, what hasn’t worked?