WordPress sliders are a great way to share a lot of information without taking up a lot of real estate on your home page. It’s popular to share information around the holidays with the appropriate holiday background. In this post, we’ll show you how to create a Valentines background for your WordPress slider in 5 minutes. We’ll create this Valentine background in Photoshop, but can be applied to other image editing programs (Gimp).
Open up Photoshop and select File/New from the main menu.

Set the size of your Photoshop file size to match the dimensions of your WordPress slider.
Let’s add a radial gradient for the background of this Valentine image.


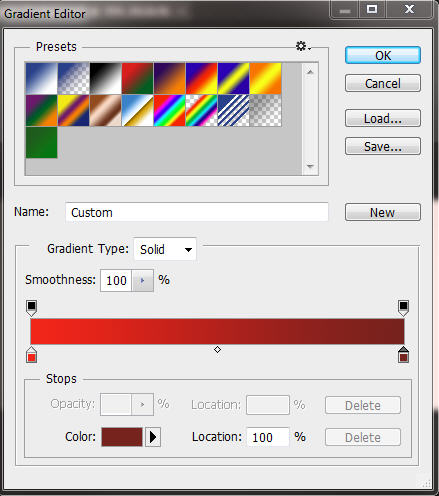
Select the gradient tool and set the gradient color stops to go from a bright red to a dark red.

Set the type of gradient to be a radial gradient in the control bar at the top of the Photoshop window.

Apply the radial gradient by clicking and dragging with the gradient tool to get the effect desired.
The next step is to add the hearts in the background. I used the brush tool and select the Leaf brush, even though it’s labeled leaf, I’m using it because of it’s heart shape.

I changed the default settings of this brush to ‘scatter’ more hearts across the background. Select the Brush Panel icon in the control panel.

I added the scattering option and set the count to 1. Increase this count if you want more hearts to show up per brush stroke. I then brushed the hearts onto the radial background, varying the brush size, the opacity settings and the blend mode with each stroke.


Continue to vary the brush settings and apply additional brush strokes till you get the desired look for the background hearts.

Add the drop shadow effect to the background hearts.


You can use this background as is and add product, event, or other type of information over it. I highly recommend the Revolution Slider for WordPress. This responsive slider lets you layer your slider elements, add images and text, and add animation to your elements.
Variations of Valentine Background for your WordPress Slider
Of course the options are endless when creating a Valentine Background.

This was created by selecting the heart shape of the custom shape tool. After drawing the shape, I copied the layer multiple times then added various effects and transformations to the individual shape layers. Then added effects to the text to finish off the background design.
If you have any questions, don’t hesitate to comment below. Or, add your favorite techniques when creating a Valentine’s background in the comments below.
