

This week we look at how to set up Photoshop headings in WordPress. If you’ve been following this series, we did quite a bit with text last week. This week we’ll focus on formatting headings in WordPress to match what we used in Photoshop.
You will need to update the CSS code to set up your Photoshop headings in WordPress. If you need help in determining where to update your CSS within your WordPress theme or to find the CSS code that needs updating, refer to the the post, How to Get the Colors I Use in Photoshop to WordPress.
Set Text for Headings
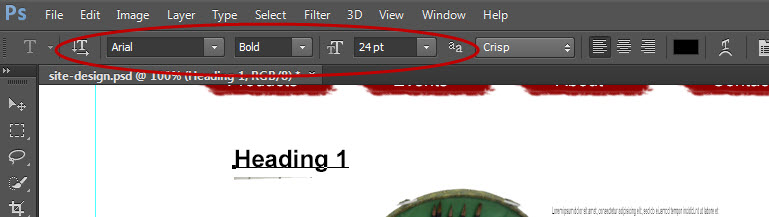
It’s common practice to set the default font and font color for all headings. To find the font, font size and color used in a Photoshop heading, select the text layer, activate the text tool and place the cursor within the heading. Observe the text settings within the control panel at the top of the Photoshop window.
The example below includes a margin setting which we’ll talk about later.
h1, h2, h3, h4, h5, h6 {
     font-family: Arial, Helvetica, sans-serif;
     color: #70160E;
     font-weight: bold;
     margin: 0px 0px 10px;
}
If headings are also links in your theme, you’ll want to set the color for linked headings. Linked headings are usually associated with blog titles and are often the h2 tag.
h2 a, h2 a:visited {
     color: #70160E;
}
Set the font size for each of your headings. An example might be:
h1, h2 {
     font-size = 28px;
}

h3 {
     font-size = 22px;
}
h4 {
     font-size = 18px;
}
h5 {
     font-size = 16px;
}
h6 {
     font-size = 14px;
}
I seldom use h5 and h6 tags so I will often not bother setting their font-size.
Set Spacing around Headings
It’s common practice to set headings apart from the following text. To do this in CSS, set the margin property. You can just use margin-bottom or if you use margin and list the values, the settings go from top to right to bottom to left. In the example above, we set the bottom margin to be 10 pixels, adding a bit of white space below the heading before the text begins.
margin: 0px 0px 10px;[thrive_leads id=’4969′]
Set Headings for Sidebar
Headings in the sidebar usually take on different formatting options than headings in the main content area. Size, color, and style are two common attributes that change when placing a heading in a sidebar. To set this up in WordPress, find the class or id your theme uses to set up sidebars. If you need help with this, learn how to use the Inspect Element option.
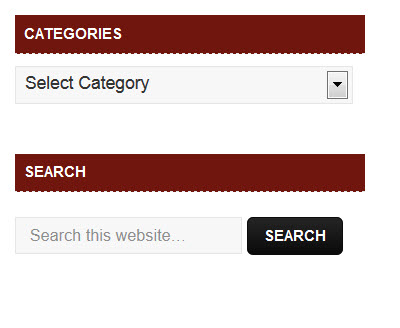
In the particular site we are updating, the class .widget-area is used to style the right sidebar area. We also learned by using the Inspect Element option that the headings inside the right sidebar area are using an h4 tag. We write the following CSS to format our h4 headings for the sidebar.
.widget-area h4 {
    background-color: #70160E;
    color: #FFF;
    border-bottom: 1px dashed #E6E6E6;
    font-size: 12px;
    font-weight: bold;
    padding: 3px 7px;
    text-transform: uppercase;
}
Background-color and color are used to set off the heading from the rest of the content. The dashed line along the bottom border adds visual interest.
If you are using an image behind your sidebar heading instead of a solid color, replace the background-color property with the background property. See Placing a Photoshop Background to WordPress. Using a background color or a background image is optional. You can just format the text to make the heading stand out without any additional formatting options.
Set Spacing of Text On Top of Background Color or Image
If you are using a background color or image, you will want to offset the text a bit from the edges of the background color/image. The padding property is used to set this offset. As in the previous example:
padding: 3px 7px;
sets the top and bottom padding to 3 pixels, the left and right paddings to 7 pixels.
Other Formatting Options for Headings
To help set your your headings apart, you may also choose to set the headings in all caps. The text-transform property allows for this:
text-transform: uppercase;
If you want to italicize your headings, use the font-style property:
font-style: italics;
What properties have you found that you often update when it comes to formatting Photoshop headings in WordPress?